Eo-IP คืออะไร?
Eo-IP เป็นฟังก์ชันที่ทาง MikroTik พัฒนาขึ้นมาเพื่อใช้งานบนอุปกรณ์ของ MikroTik ด้วยกันโดย Eo-IP จะทำการส่งข้อมูลที่อยู่ในชั้นของ Layer2 (Data-link) ให้สามารถข้ามผ่าน IP Routing ได้ เช่น การแชร์ไฟล์ การเล่นเกมส์ภายในวงแลนเดียวกัน เปรียบเสมือนกับการใช้สายแลนเสียบเข้ากับคอมพิวเตอร์โดยตรงถึงจะอยู่ต่างพื้นที่กันก็ตาม ทำให้ DHCP Server สามารถทะลุไปหาเครื่องปลายทางได้
ขั้นตอนการตั้งค่า Eo-IP ร่วมกับ L2TP+IPSec
ตั้งค่าอุปกรณ์ Routerboard ฝั่ง HQ (ต้นทาง)
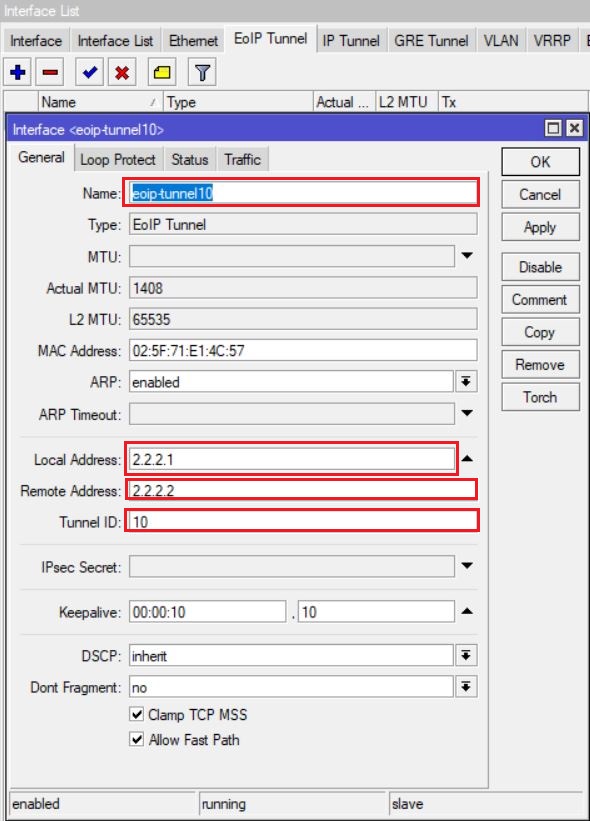
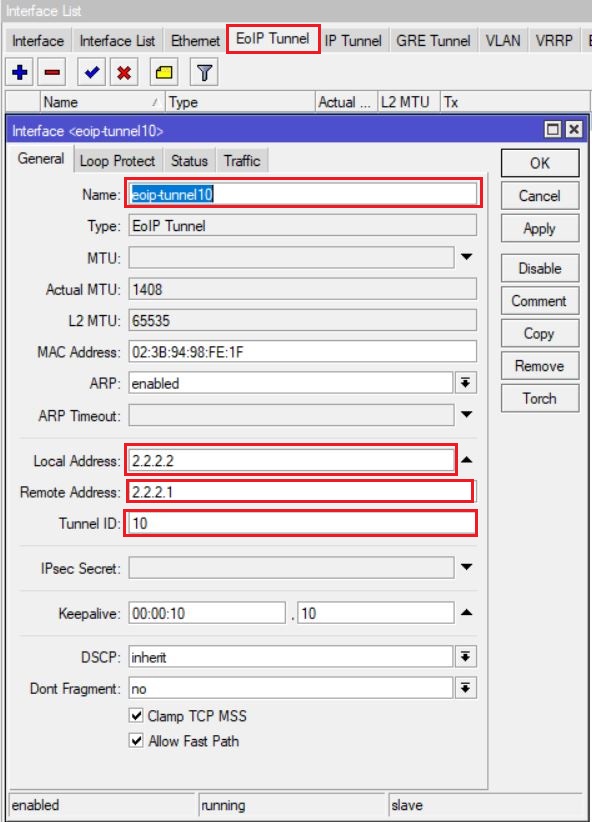
1. เลือกเมนู Interface List หาหัวข้อ " EoIP Tunnel "
- Name : eoip-tunnel10
- Local Address : 2.2.2.1
- Remote Address : 2.2.2.2
- Tunnel ID : 10
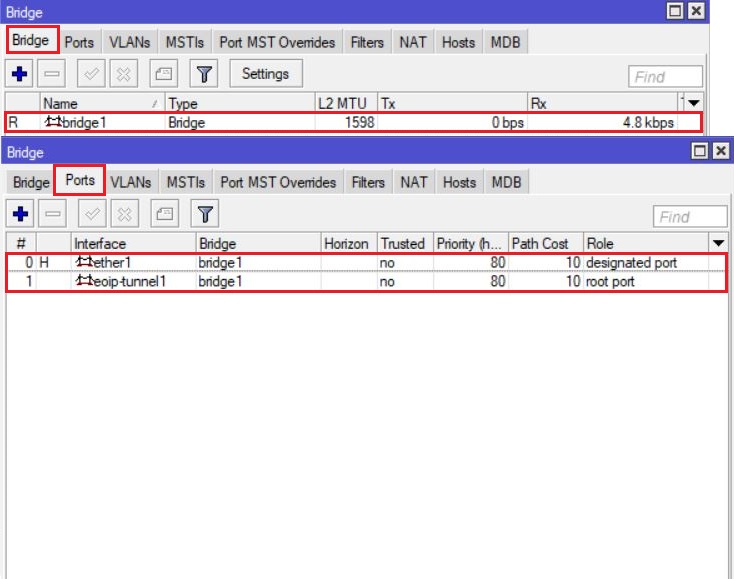
2. เมนู bridge ทำการตั้งค่าตามกรอบสีแดงตามรูป
- กดปุ่ม Add แล้วทำการสร้าง Bridge ขึ้นมาชื่อว่า " bridge1 "
- หัวข้อ "Ports" กดปุ่ม Add เลือก Interface ที่ต้องการให้อยู่ภายใต้ bridge1 (eoip-tunel10, ether6 อยู่ภายใต้ bridge1)

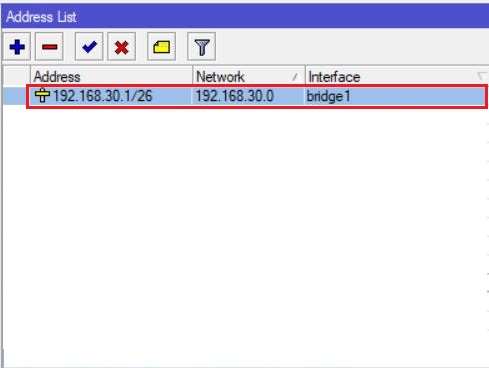
3. เมนู " Address List " ทำการตั้งค่า IP Address ให้กับ Interface bridge1
- (ตัวอย่าง เช่น Address : 192.168.xx.1/24, Network : 192.168.xx.0, Interface : bridge1)
4. ต้องค่า DHCP Server เพื่อแจก IP Address ให้กับ " bridge1 "

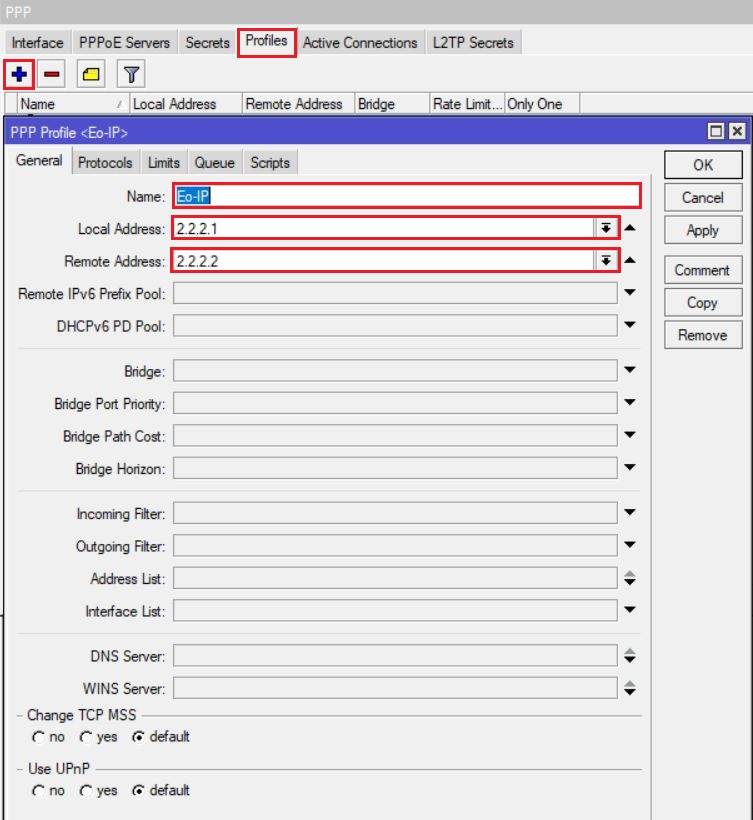
5. เมนู PPP หัวข้อ " Profiles "
- กดปุ่ม Add เพื่อทำการสร้าง PPP Profiles
- Name : Eo-IP (ตั้งชื่อสำหรับ Profiles ที่สร้างขึ้นมา)
- Local Address : 2.2.2.1
- Remote Address : 2.2.2.2
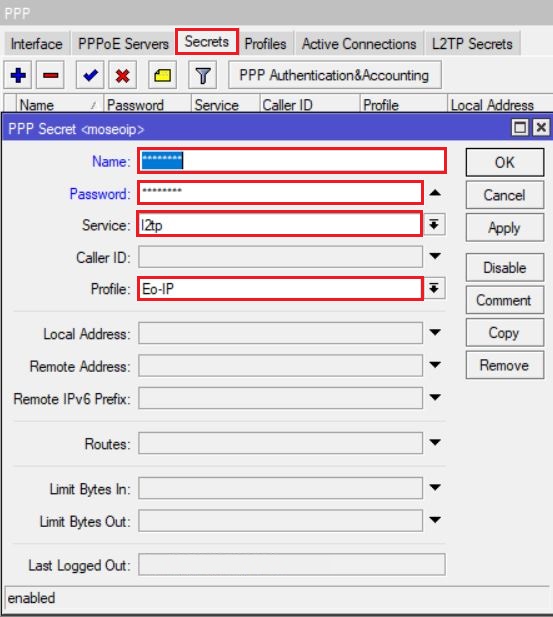
6. เมนู PPP หัวข้อ " Secrets "
- Name : (กำหนด User name สำหรับใช้ Login สำหรับเครื่อง Client)
- Password : (กำหนด Password สำหรับใช้ Login สำหรับเครื่อง Client)
- Profile : (เลือก Profile ที่สร้างไว้ก่อนหน้านี้ ดังตัวอย่าง : Eo-IP)
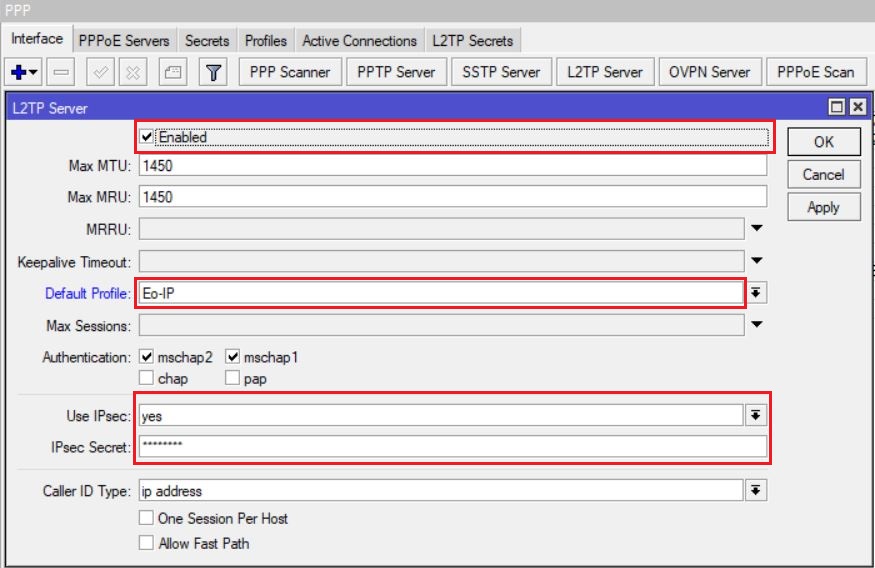
7. เมนู PPP หัวข้อ " L2TP Server "
- เลือกเครื่องหมายถูกตรงหน้าคำว่า " Enabled "
- Default Profile : เลือก Profile ที่สร้างมาก่อนหน้านี้ดังตัวอย่าง : Eo-IP)
- Use IPsec : yes
- IPsec Secret : (กำหนด รหัสผ่านสำหรับ IPsec)
ตั้งค่าอุปกรณ์ Routerboard ฝั่ง ฺBranch (ปลายทาง)
8. เมนู PPP หัวข้อ " L2TP Client "
- หัวข้อ Dial Out ตั้งค่าดังตัวอย่าง
- Connect To : ใส่หมายเลข IP ของฝั่ง HQ หรือ Cloud
- User : ใส่ username ที่ทางฝั่ง HQ กำหนดมาให้
- Password : ใส่ password ที่ทางฝั่ง HQ กำหนดมาให้
- Use IPsec : ทำเครื่องหมายถูก
- IPsec Secret: ใส่รหัสผ่านของ IPsec ทางฝั่ง HQ

9. เมนู Interface List หัวข้อ " EoIP Tunnel "
- กดปุ่ม Add แล้วทำการตั้งค่าดังตัวอย่าง
- Name : eoip-tunnel10
- Local Address : 2.2.2.2
- Remote Address : 2.2.2.1
- Tunnel ID : 10
10. เมนู bridge ทำการตั้งค่าตามกรอบสีแดงตามรูป
- กดปุ่ม Add แล้วทำการสร้าง Bridge ขึ้นมาชื่อว่า " bridge1 "
- หัวข้อ "Ports" กดปุ่ม Add เลือก Interface ที่ต้องการให้อยู่ภายใต้ bridge1 (eoip-tunel1, ether1 อยู่ภายใต้ bridge1)
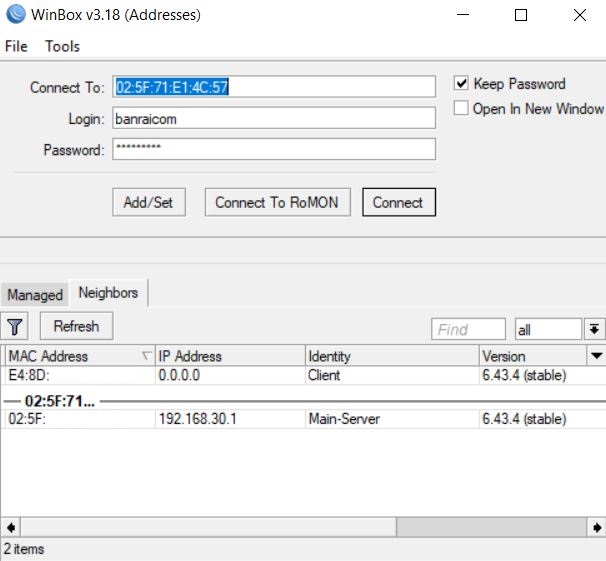
11. ตัวอย่างการเชื่อมต่อระหว่าง Main-Server กับ Client ผ่าน Eo-IP Over L2TP+IPsec
นึกถึงทีมงานมืออาชีพนึกถึง VRProService

![[Basic] คู่มือการตั้งค่า MikroTik ง่ายๆด้วยตัวเอง](https://www.vrproservice.com/image/cache/catalog/blog/Unt-2-55x55h.png)
![[Trick] วิธีตั้งค่า VPN L2TP-IPsec X Mobile เบื้องต้น](https://www.vrproservice.com/image/cache/catalog/Trick/L2TP-IPsec%20X%20Mobile/office-620822_1920-55x55h.jpg)
![[Trick] วิธีเก็บ Log & ส่ง Log MikroTik To Kiwi Syslog](https://www.vrproservice.com/image/cache/catalog/Trick/Sent%20Log%20To%20Kiwi%20syslog/technology-1587673_1280-55x55h.jpg)
![[Trick] วิธี Downgrade Version อุปกรณ์ MikroTik](https://www.vrproservice.com/image/cache/catalog/Trick/Downgrade%20Router/download-1915749_1280-55x55h.png)
![[Trick] กำหนดค่า Static IP Address ด้วยตัวเอง](https://www.vrproservice.com/image/cache/catalog/Trick/Static%20Manaul%20IP%20Address/tools-864983_1920-55x55h.jpg)